EHallPass is a comprehensive system designed to facilitate creating and managing appointment passes within educational institutions. This tool allows teachers, staff, and administrators to schedule and oversee appointments for students efficiently. By integrating a dynamic system of appointment passes, EHallPass aims to streamline the process of managing student movements for appointments, ensuring a well-organized approach to handling student schedules.
Creating an Appointment Pass
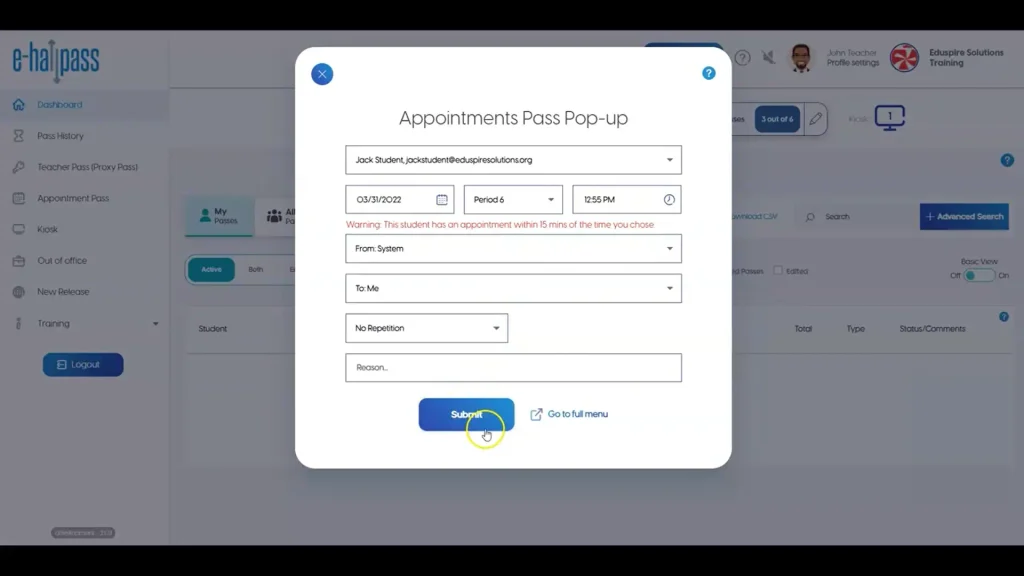
Users can access the system via the menu on the left side of the EHallPass interface or directly through the blue ‘Create‘ button to begin creating an appointment pass. This flexibility in access points makes it easy to initiate the creation of a new appointment pass.
- Initiate Pass Creation: Click on the blue ‘Create’ button to open the appointment creation fields.
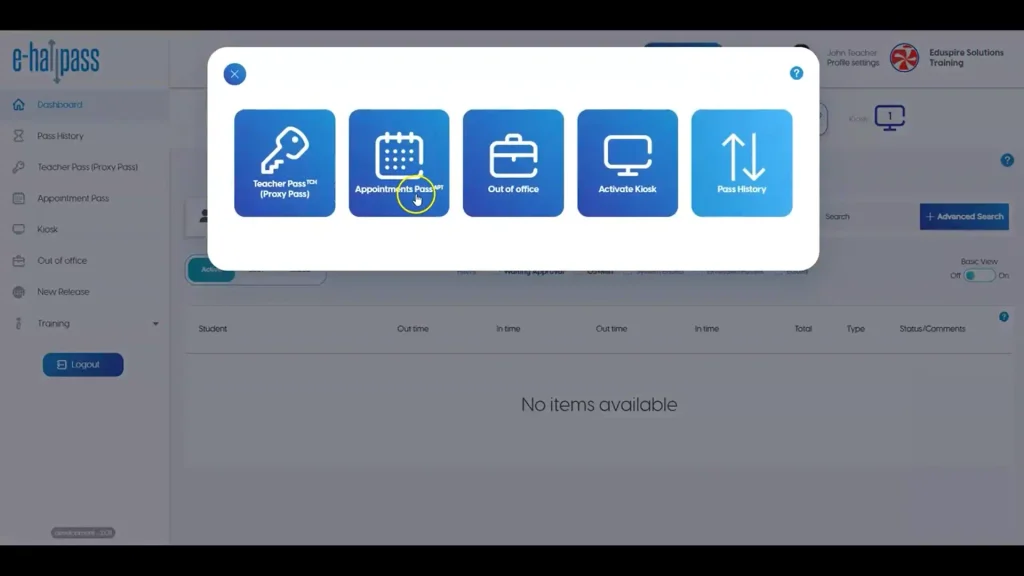
- Enter Appointment Details:
- Student Search: Search and select the student for whom the appointment is being scheduled.
- Date and Time: Specify the date and select the time for the appointment. If the time field is not filled, it defaults to the current time.
- From Field: Indicate the teacher or adult the student is currently with, which helps in notifying the responsible adult about the upcoming appointment.
- Setting Recurrences: If the appointment is recurring, choose the frequency (daily, weekly, monthly) and specify the details, such as meeting every Thursday at 3 PM.
- Reason for Appointment: Enter a valid reason for the appointment to inform all parties involved.
- Add Additional Students: If necessary, additional students can be added to the same appointment by clicking the ‘Add’ button.
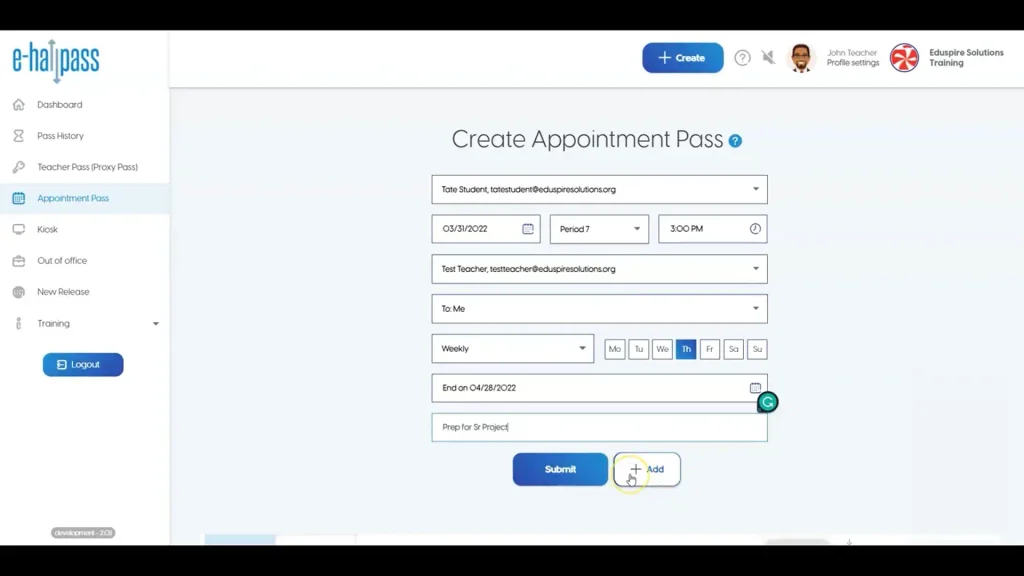
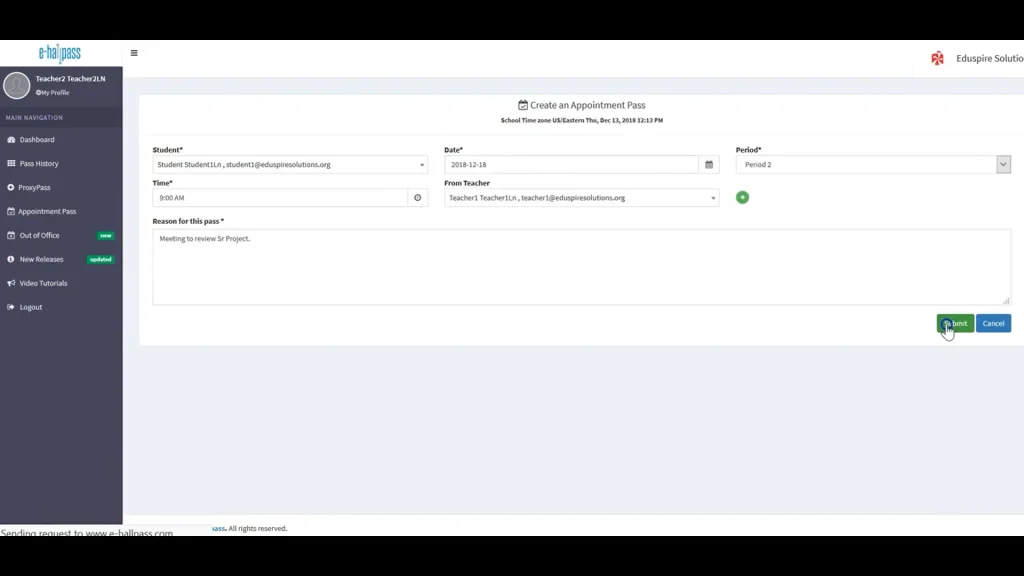
- Submission: After verifying all the details, click ‘Submit’ to finalize the appointment pass.
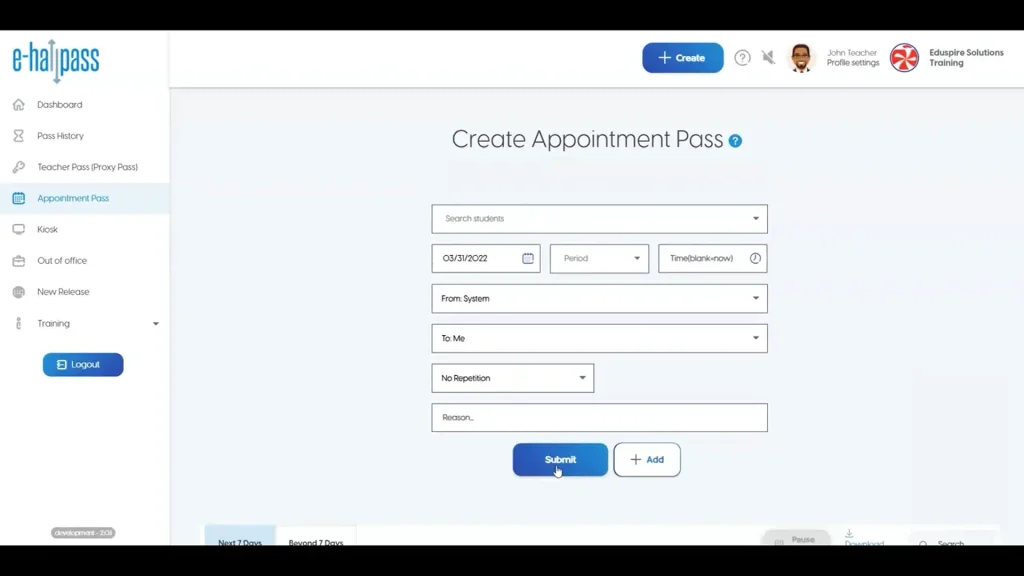
Viewing and Managing Appointment Passes
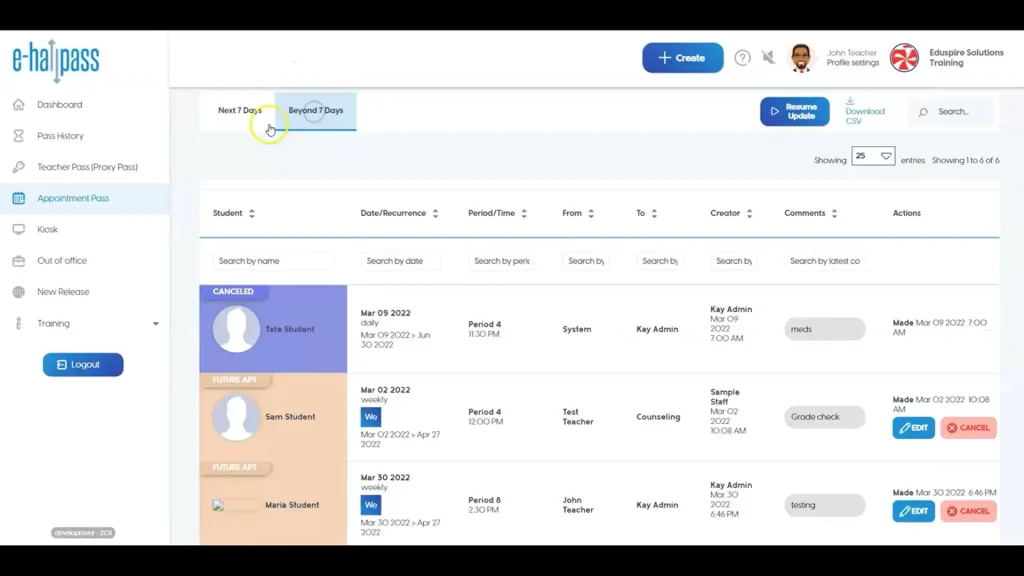
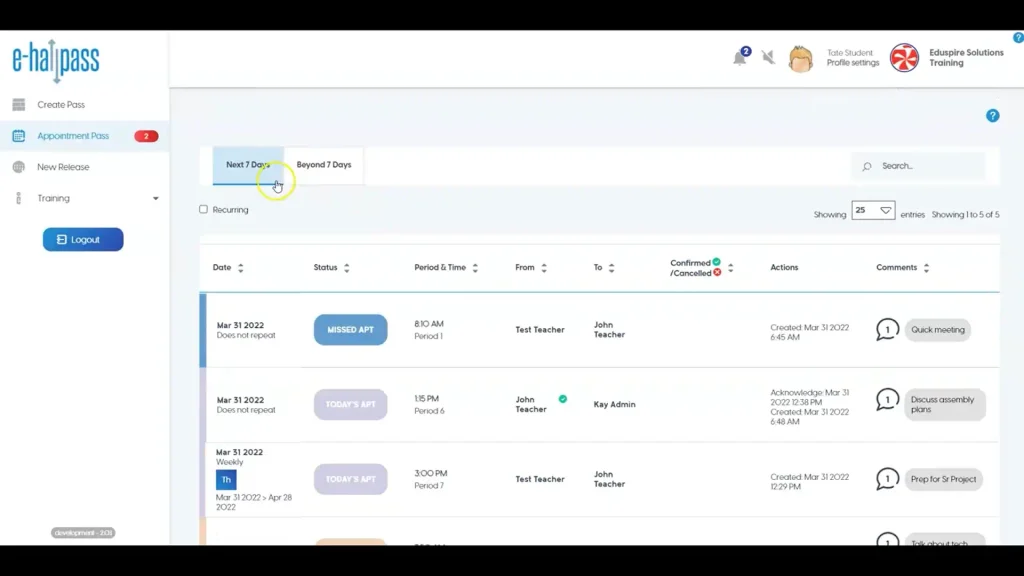
The main appointment pass menu provides a comprehensive view of all current and future appointment passes. Users can see passes scheduled for the next seven days and beyond. Features include:
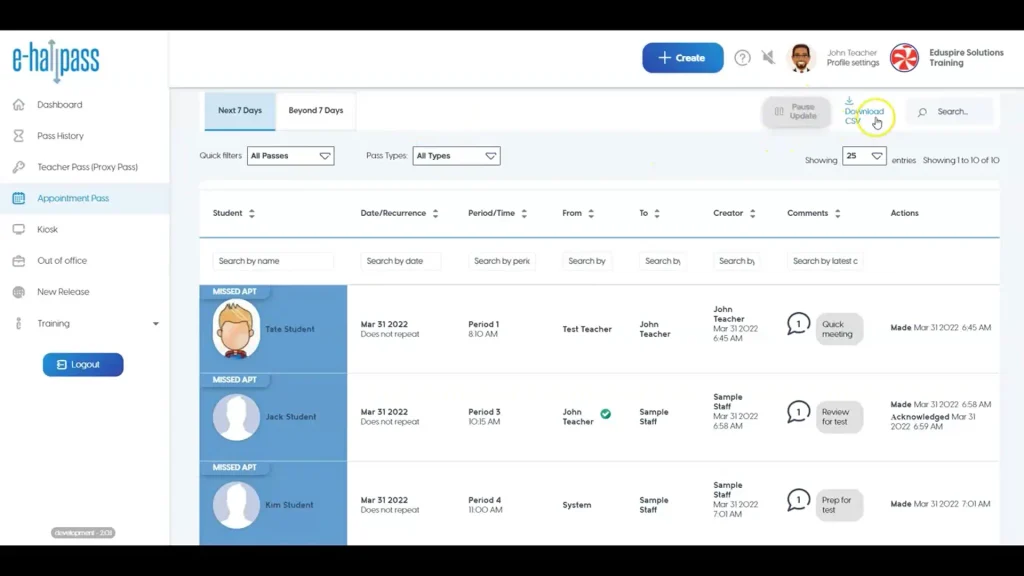
- Filter Options: Users can filter passes by type, such as viewing only missed appointments.
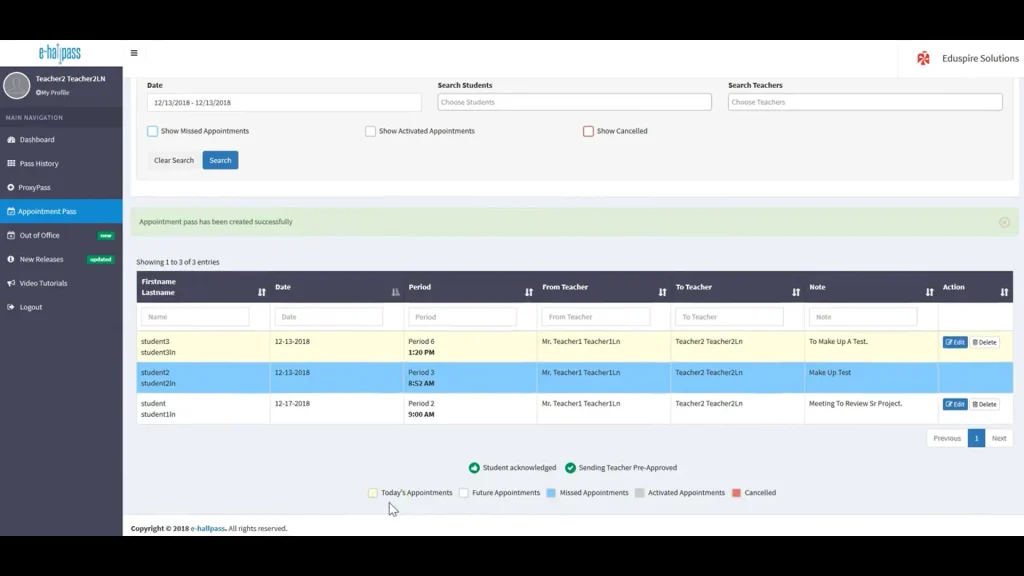
- Color Codes and Legends: Each pass is color-coded, and a legend is available for reference to quickly identify the type of pass.
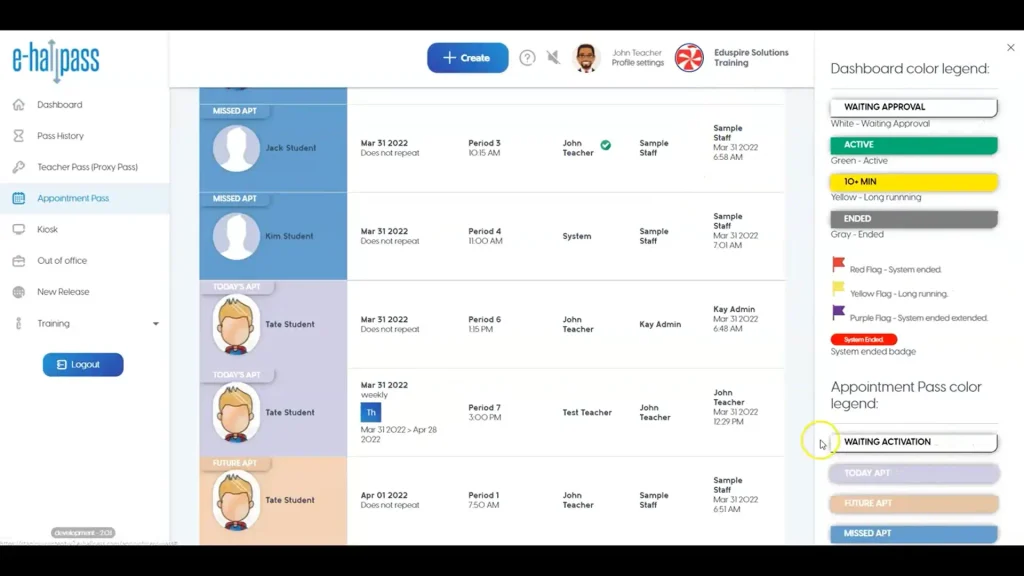
- Managing Appointments: Adults have the option to acknowledge, edit, or cancel passes directly from the appointment pass menu.
- Recurring Appointments: Recurring appointments are displayed individually for the next seven days and grouped in the Beyond 7 Days tab, ensuring easy tracking and management of regular appointments.
Additional Functionalities
Users can quickly search for specific passes or download appointment data to a CSV file, enhancing the usability and accessibility of appointment data.
Notifications and Communications
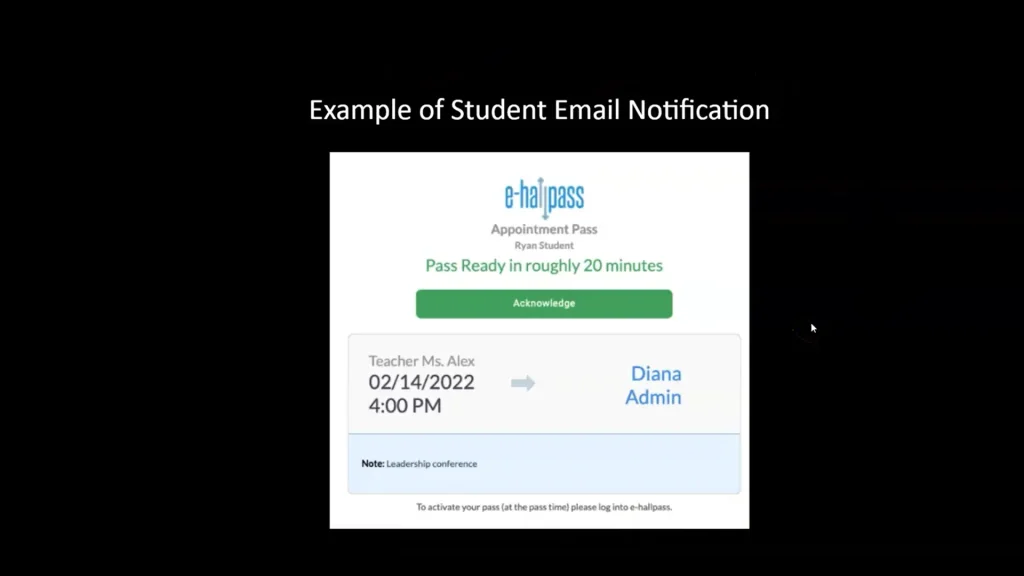
The system is equipped with an integrated notification system that informs students and teachers about their daily schedules through early morning agenda emails.
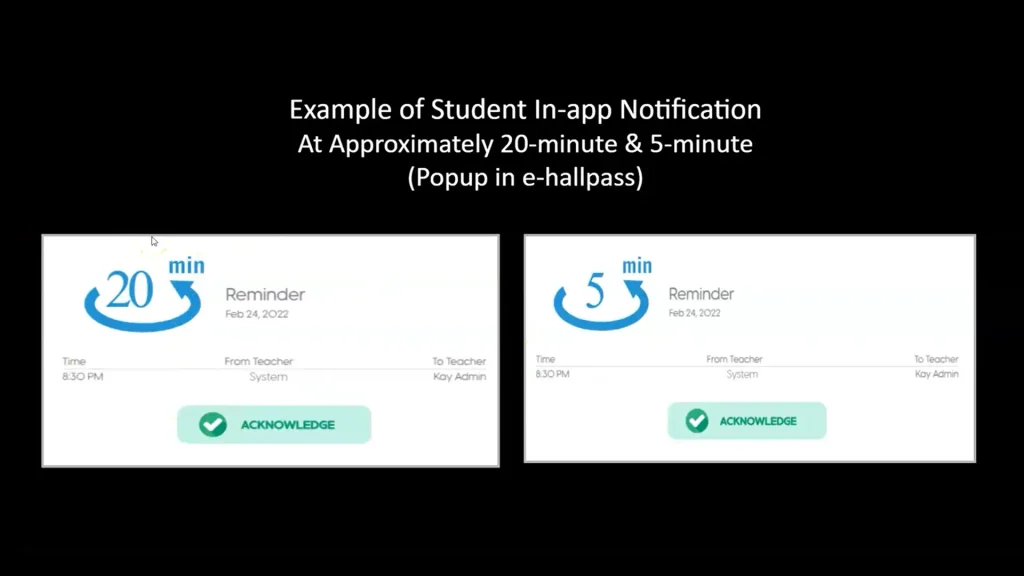
Additional notifications are sent via email and in-app messages 20 and 5 minutes before the appointment time.
Student Interaction with EHallPass
Students also have access to their appointment pass menu where they can view their appointments, add comments, and receive notifications. This promotes active participation from students in managing their schedules.
Appointment Pass Editing & Deleting
Managing appointment passes within the EHallPass system allows teachers, staff members, and administrators to ensure that all scheduled activities align with day-to-day changes and student needs. Following are the procedures for modifying or removing appointment passes crucial for maintaining an up-to-date and accurate schedule.
Editing an Appointment Pass
Step 1: Access the Appointment Pass Menu
- Log into the EHallPass system using your designated teacher, staff, or admin credentials.
- Access the main appointment pass menu to view a complete list of scheduled appointments.
Step 2: Locate the Appointment to Edit
- Find the appointment you wish to change. Appointments are categorized as today’s appointments, future appointments, or missed appointments.
Step 3: Modify the Appointment
- Click the ‘Edit’ button located to the right of the appointment you intend to modify.
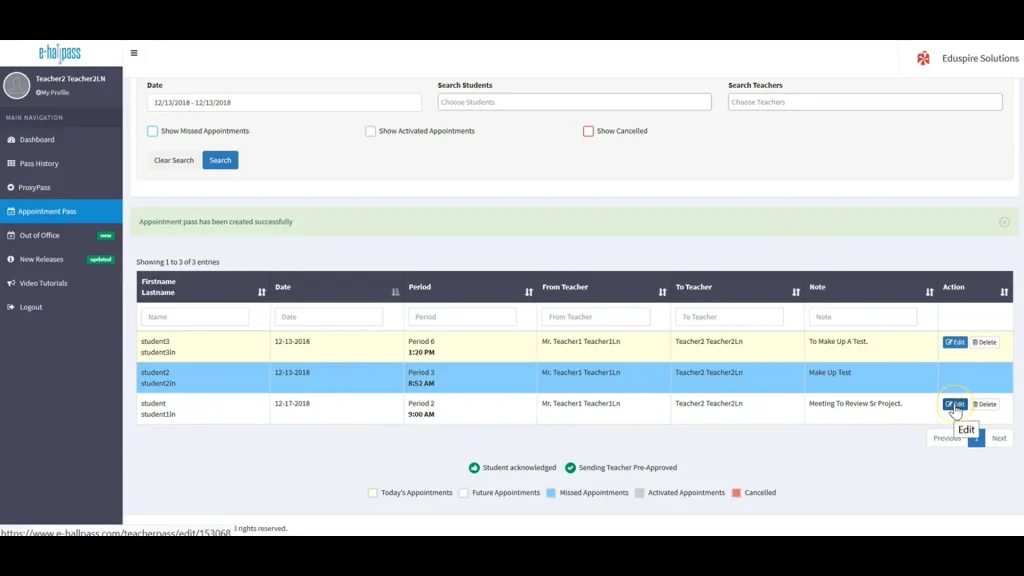
- In the editing interface, you can alter details such as the appointment date, time, or participants. For instance, if an appointment is set for Monday, you can reschedule it for Tuesday.
- After making the desired changes, click ‘Submit’ to save them. These modifications will be immediately reflected in the list of appointments.
Deleting an Appointment Pass
Step 1: Identify the Appointment to Delete
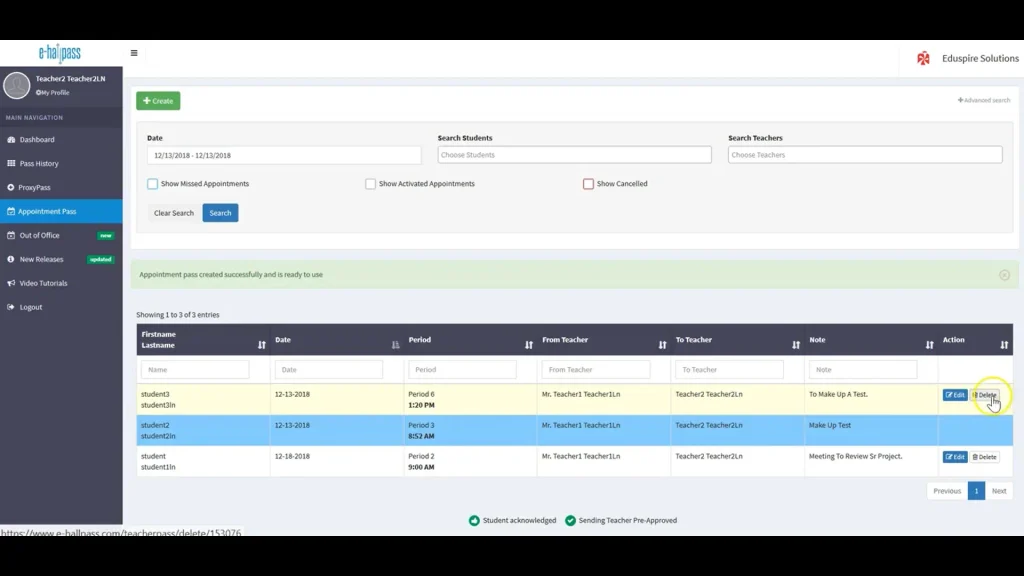
- From the main appointment pass menu, locate the appointment that needs to be deleted, listed either as a current or future appointment.
Step 2: Execute the Deletion
- Select the ‘Delete‘ button adjacent to the appointment you want to remove.
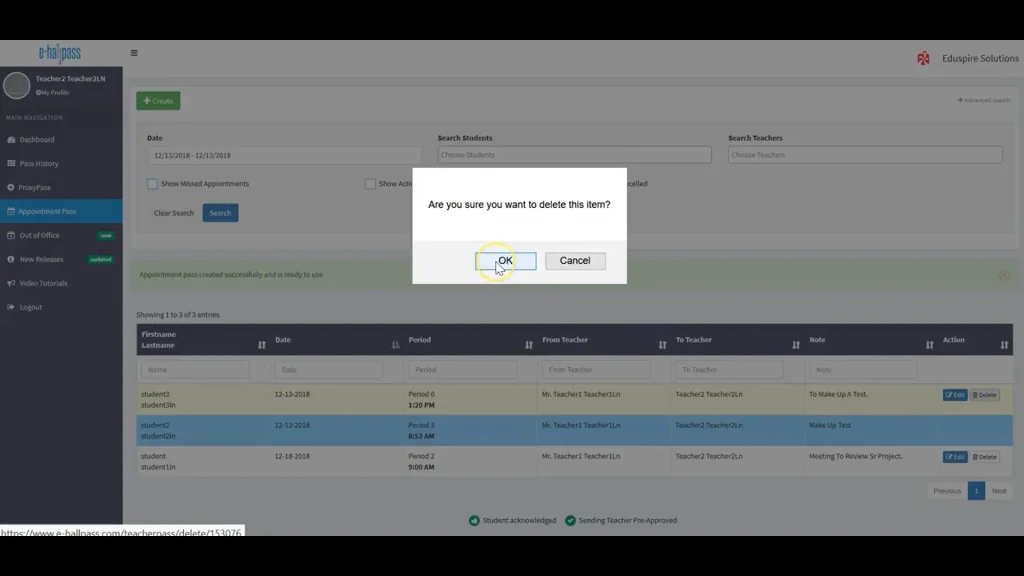
- A confirmation dialog box will appear. Click ‘OK’ to confirm the deletion or ‘Cancel’ if you decide not to proceed.
Step 3: Alternate Deletion Method
- Navigate to the dashboard and go to the ‘Today’s Appointments’ section.
- Locate the same appointment here, which will also display options to edit or delete.
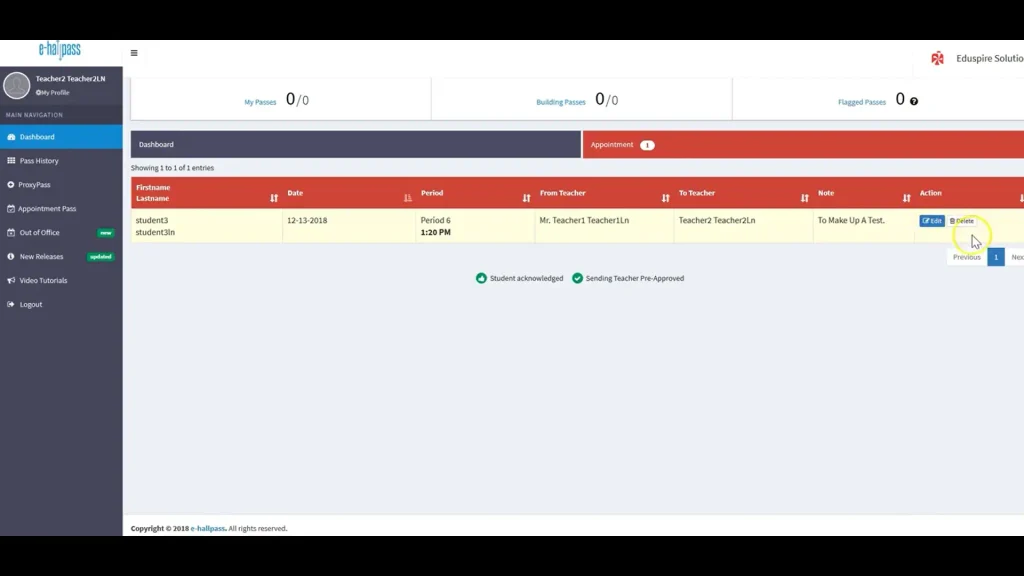
- To proceed with deletion from this screen, click on ‘Delete’ and confirm by selecting ‘OK’.
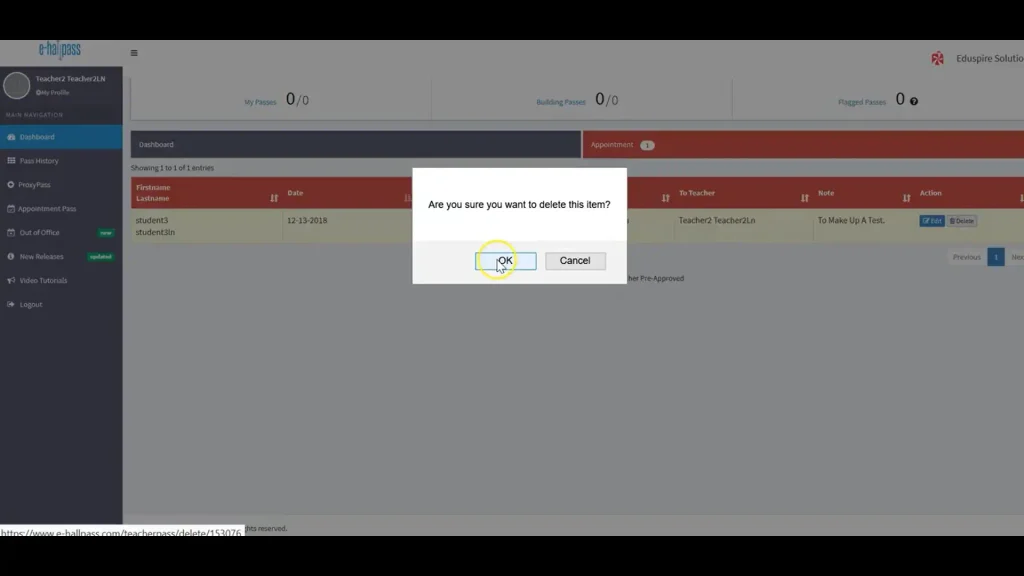
Step 4: Confirm the Removal
- After the deletion, return to the main appointment pass menu to verify that the appointment has been successfully removed from the listing.
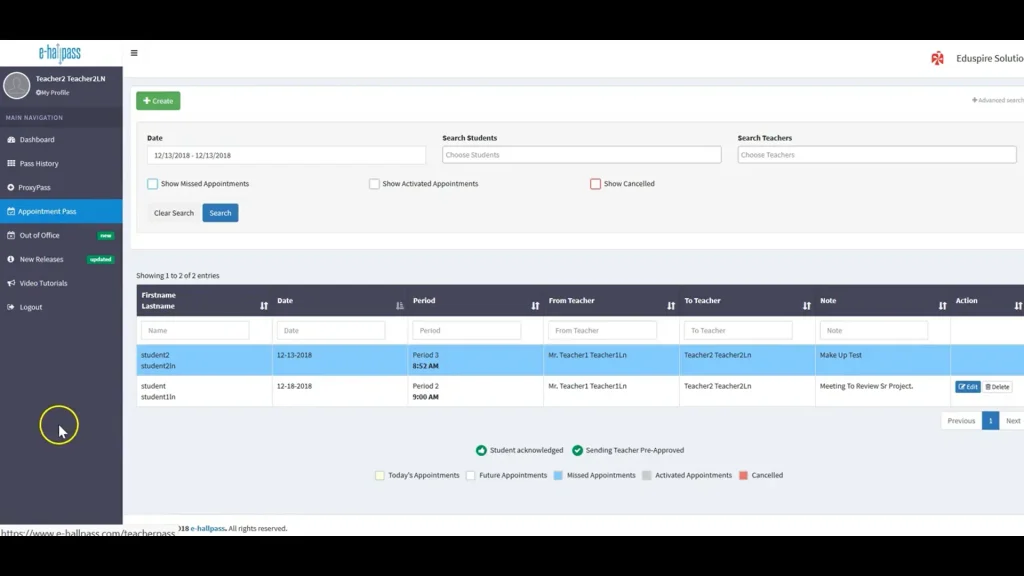
Following these steps ensures that teachers, staff, and administrators can effectively manage the timing and details of student appointments, adapting quickly to any necessary changes. This process supports the dynamic needs of educational environments by providing a method to easily adjust or cancel scheduled appointments.
Managing Multiple Student Appointment Passes with EHallPass
EHallPass provides a streamlined solution for managing appointment passes for multiple students, allowing teachers, staff members, and administrators to adapt quickly to changes and align scheduled activities with daily needs. This system plays a crucial role in keeping school schedules efficient and accurate. The following instructions detail how to edit and delete appointment passes for one or more students, ensuring all parties are informed and the school’s operational needs are met.
Editing Appointment Passes for Multiple Students
Step 1: Access the Appointment Pass Menu
- Log In: Use your teacher, staff, or admin credentials to log into the E-HallPass system.
- View Appointments: Once logged in, navigate to the main appointment pass menu to see a complete list of scheduled appointments, which includes today’s appointments, future appointments, and missed appointments.
Step 2: Locate the Appointment to Edit
- Find Appointment: Identify the appointment you need to modify. The system categorizes appointments to help you quickly find the one you are looking for.
Step 3: Modify the Appointment
- Edit Appointment: Click the ‘Edit’ button next to the appointment you wish to change.
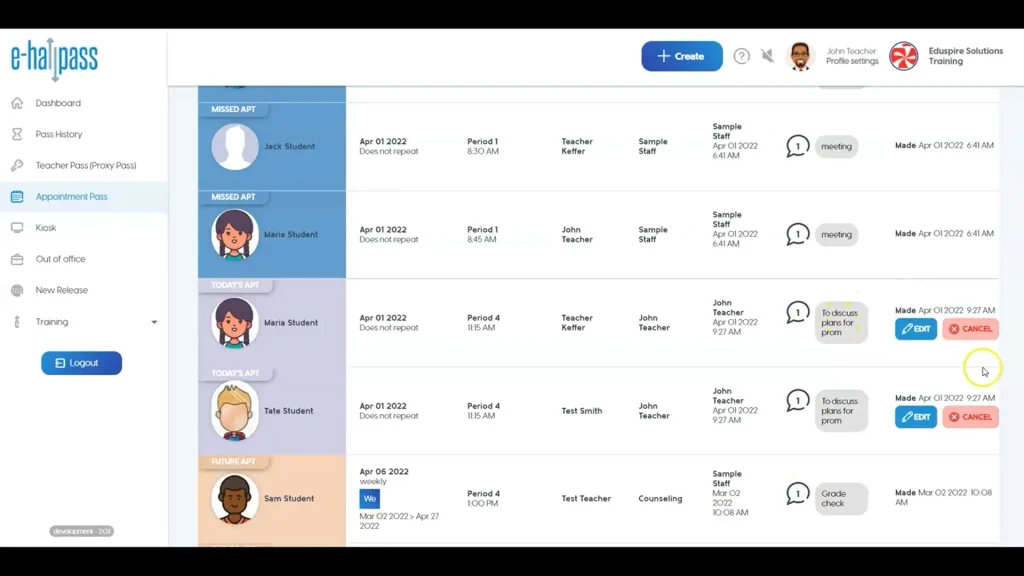
- Make Changes: In the editing interface, update any details such as the date, time, or participants. For example, if an appointment is scheduled for Monday, it could be rescheduled to Tuesday.
- Save Changes: After adjusting the necessary details, click ‘Submit’ to apply the changes. These modifications will be immediately updated in the appointment list.
Deleting Appointment Passes for Multiple Students
Step 1: Identify the Appointment to Delete
- Locate Appointment: In the main appointment pass menu, find the appointment that needs to be removed. It will be listed as either a current or future appointment.
Step 2: Execute the Deletion
- Delete Appointment: Click the ‘Delete’ button adjacent to the appointment entry.
- Confirm Deletion: A confirmation dialog box will appear. Select ‘OK’ to proceed with the deletion or ‘Cancel’ to abort the process.
Step 3: Alternative Deletion Method
- Navigate to Dashboard: Go to the dashboard and access the ‘Today’s Appointments’ section.
- Find and Delete: Locate the same appointment, which will also have edit and delete options. Click on ‘Delete’ and confirm by choosing ‘OK’.
Step 4: Confirm the Removal
- Verify Deletion: After confirming the deletion, return to the main appointment pass menu to ensure that the appointment has been successfully removed.
By following these steps, school staff can efficiently manage multiple student appointments, making necessary adjustments or cancellations to accommodate the evolving educational environment. This ensures all students and staff are up-to-date with the latest scheduling changes.
