An EHallPass is a digital system that replaces traditional school paper hall passes. It offers a more efficient, secure, and accountable way to manage student movement. Administrators and teachers can easily grant hall passes using the system while monitoring and tracking students in real time. This helps streamline the process and improve overall school management.
EHallPass enhances classroom management by enabling teachers to monitor student locations in real time and control the number of students exiting the classroom simultaneously. This functionality not only optimizes learning time by reducing classroom interruptions but also improves students’ understanding of their movements and responsibilities. The system’s user-friendly interface allows students to request passes easily, contributing to a smoother school operation and a more conducive learning environment.
What is unique about EHallPass?
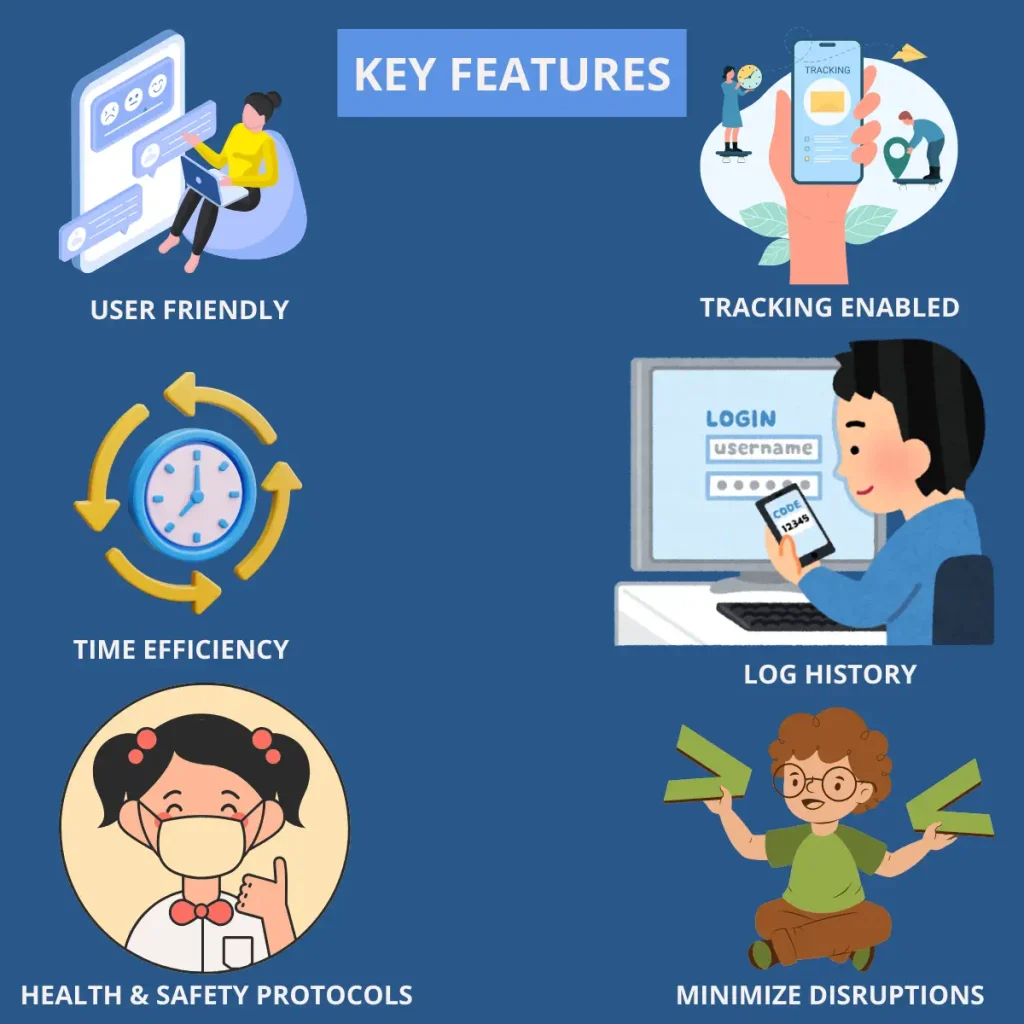
Unlike traditional paper hall passes, an EHallPass allows teachers to monitor students’ activity in real time. This enhances safety and compliance. An EhallPass also limits the number of students leaving the classroom simultaneously, which minimizes disruptions and enhances learning.
With an EhallPass, students can request passes via an online system, which is an easy and quick process. This streamlines the approval process and keeps the record organized. In school hallways, a quieter and orderly environment is promoted. An EHallPass decreases the number of students while managing the issuance of the passes. This system also encourages accountability and a history log of all past activities, enabling schools to review patterns and address issues efficiently.
How to Sign Up for an E-HallPass?
Looking for a way to have an organized school experience? Sign Up for an E-HallPass. Following are the simple steps for registering your account:
- Accessing E-Hall Pass System: Launch a web browser and navigate to the E-HallPass website, or use the App on your mobile device.
- Register: Click the “Sign Up” button in the top right corner of the homepage. An account can be made using third-party websites including Google, Clever, Microsoft 365, ClassLink, and GG4L.
- Select Role: To customize the experience to your needs, choose whether you are a student, teacher, or administrator.
- Email Entry: Input your school email address.
- Create Password: Set a strong, secure password.
- Agree to Terms: Review and accept the E-HallPass Terms of Use and Privacy Policy.
- Email Confirmation: Check your inbox for a confirmation email from the E-HallPass.
- Verify Account: Click the link in the confirmation email to verify your email address.
Complete Your Profile
Once you have signed up and made an account, it is important to complete your profile. Here is what is required to complete your profile for creating an EHallPass:
- Enter Details: Input your name, school, grade, and email accurately.
- Set Password: Choose a memorable, strong password.
- Profile Photo (Optional): Optionally upload a profile photo for easier identification.
- School Information: Provide specific details like your class schedule to tailor hall pass permissions.
- Set Preferences: Adjust settings like notifications and hall pass limits.
- Review and Save: Confirm the accuracy of your details before saving.
- Learn Features: Explore the system to understand digital hall pass usage.
- Update Regularly: Keep your profile updated with any schedule changes.
Access EHallPass on Mobile
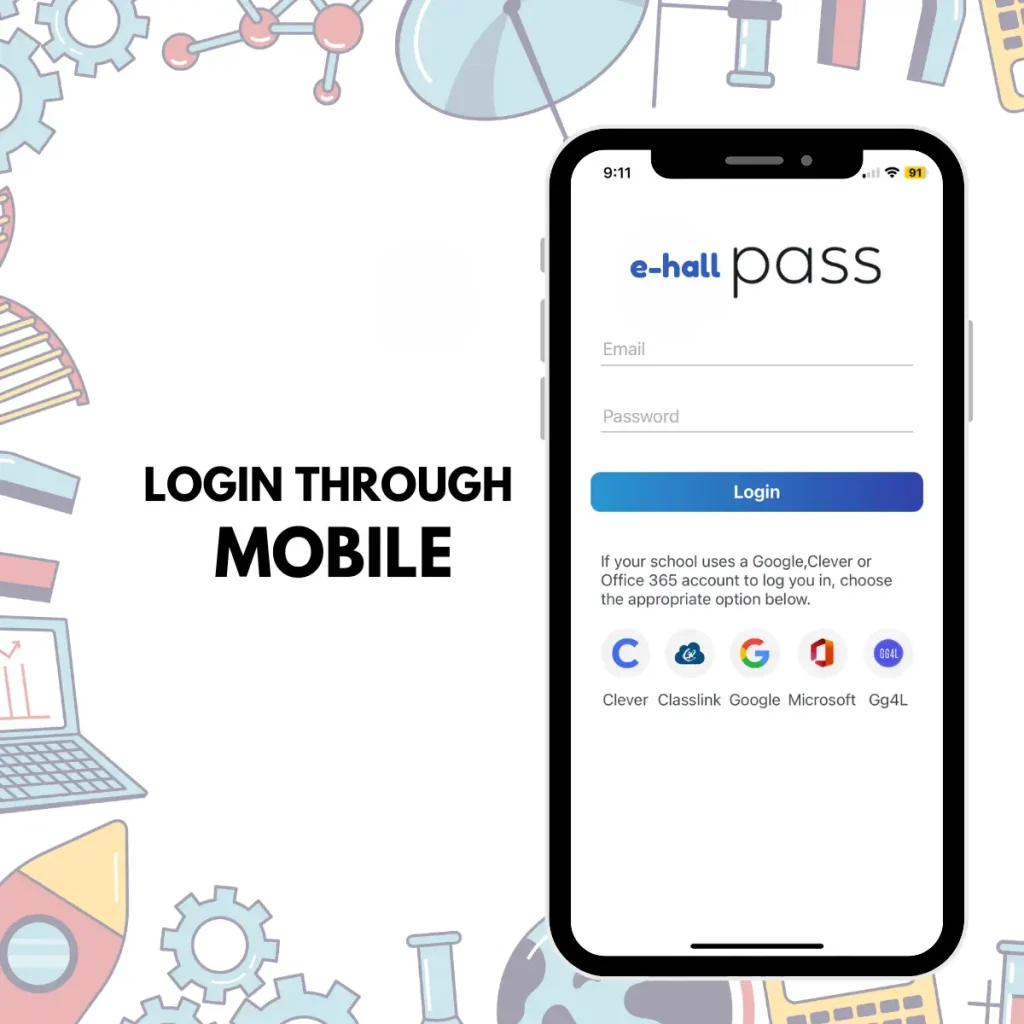
Students and teachers can both access the E-HallPass through their mobile devices. Regardless if they are using an Android or an iOS device, the following are the steps they can follow to access it.
- Open the App: Launch the E Hall Pass app on your mobile device. An Android user can search for the App on Play Store and an iOS user can navigate to the Apple Store.
- Download the App: Download the App and click on it to get started.
- Navigate to Login: Go to the EHallPass App and log in/sign up through your account.
- Enter Credentials: Type in your username and password in the appropriate fields.
- Sign in Tap the sign-in button to access your account and manage your hall pass requests
Access E-HallPass on Desktop
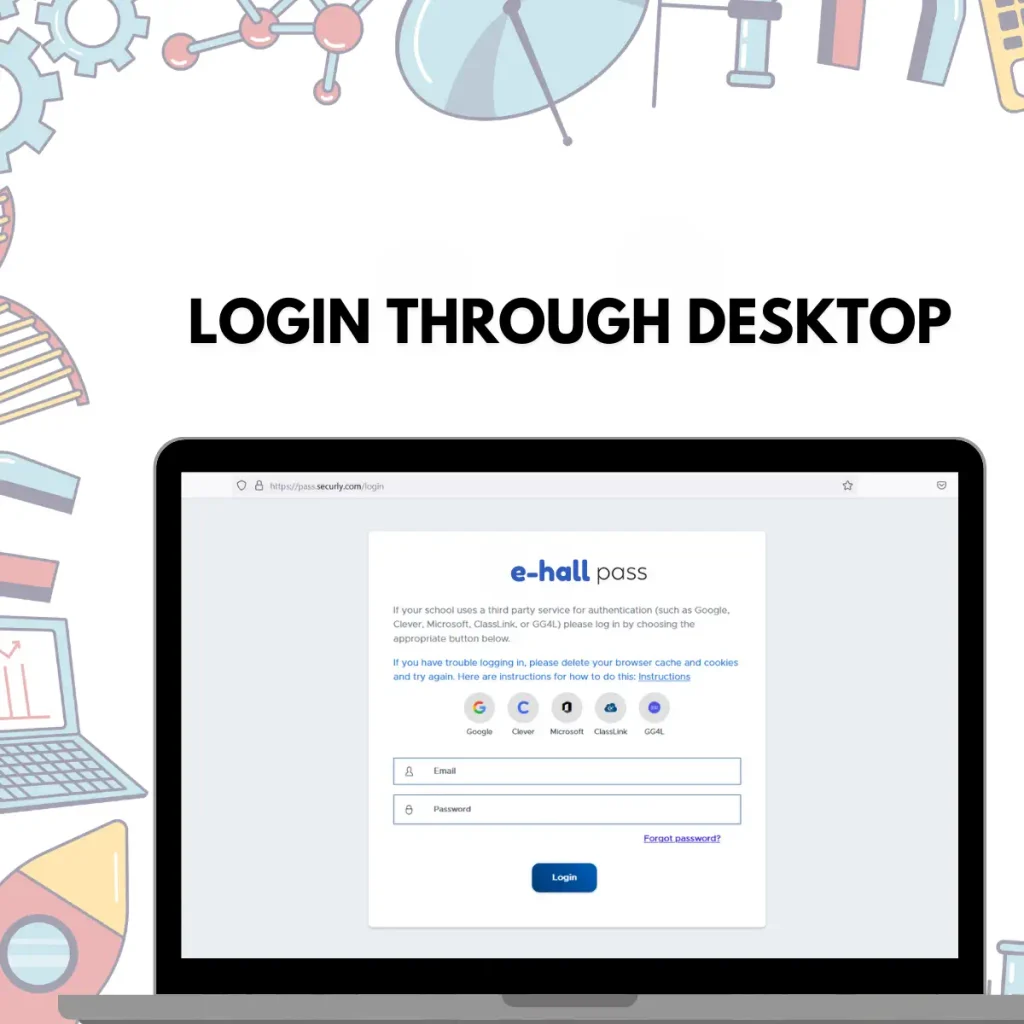
Accessing E-Hall Pass on a desktop is straightforward, allowing you to manage hall passes efficiently. Here are the steps to get started:
- Open a Web Browser: Launch your preferred web browser on your desktop.
- Visit the Website: Navigate to the E-HallPass login page by entering the URL provided by your school or found in the welcome email.
- Log In: Enter your school credentials in the designated fields. These could be your school email and a password or a single sign-on if your school uses that feature.
- Access Features: Once logged in, you can create, manage, and view hall passes from the dashboard.
How to create an E Hall Pass: A Student Guide
Creating a pass using E Hall Pass simplifies the process of managing your movements within the school, ensuring both safety and efficiency. As a student, E Hall Pass allows you to digitally request and receive permissions for various needs, from attending sessions with different teachers to accessing various school facilities. This guide will walk you through each step of the pass creation process, from logging into the system to having your pass approved by your teachers. By setting up favorites and using shortcuts, you can make the process quicker and tailor it to your regular routines.
Step 1: Login and Access the Create Pass Menu
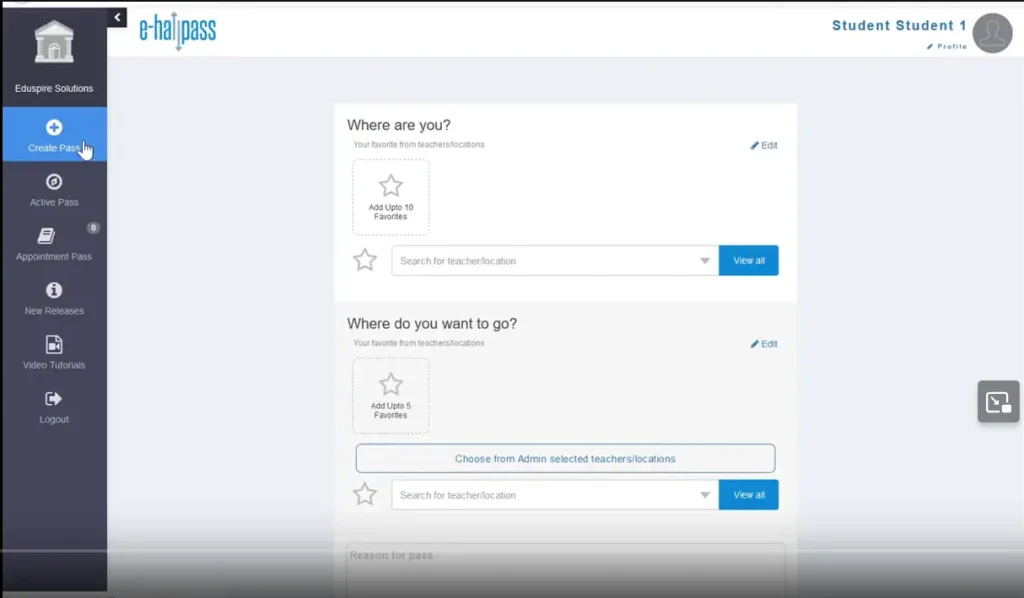
- Start by logging into your EHallPass account and navigate to the ‘Create Pass‘ menu.
Step 2: Setup Favorites
- Adding Teacher Favorites:
- Use the search box to find teachers by their names. Click the star next to a teacher’s name to add them to your favorites.
- Favorites will be indicated by a blue bubble with the teacher’s initial or profile picture.
- Adding Location Favorites:
- Search for locations within your school, such as the library or gym.
- Click the star next to the location to make it a favorite.
Step 3: Utilize School Set Shortcuts
- Be aware of shortcuts preset by the school administrator, like bathrooms, which are accessible to all students.
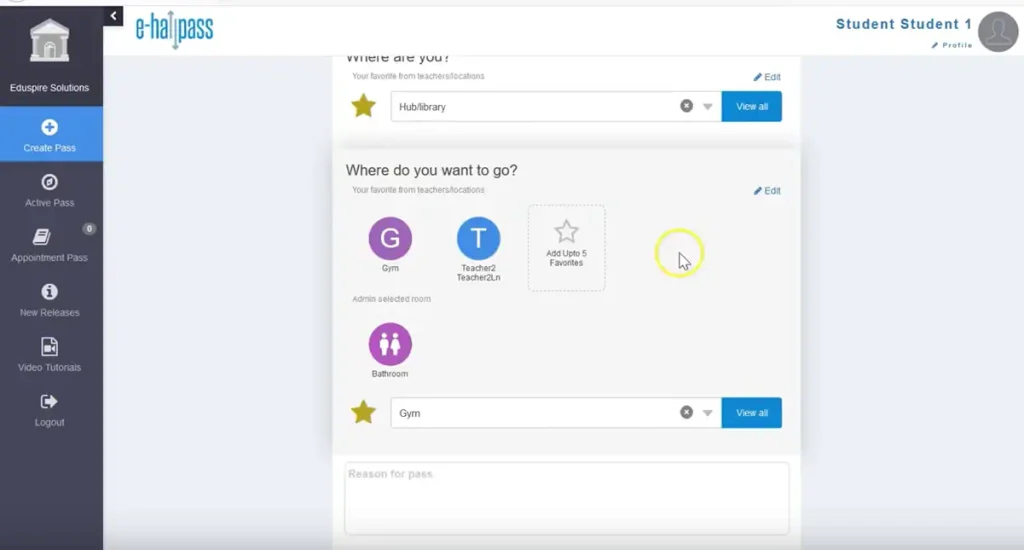
Step 4: Create Personalized Shortcuts
- If you frequently visit certain teachers or locations, make them a shortcut by clicking the star next to their names in your search results.
- Personal shortcuts will appear before administrative shortcuts in your list.
Step 5: Initiate the Pass Creation
- Select the teacher you are leaving from (e.g. Teacher One) as your starting point.
- Choose the destination teacher (e.g. Teacher Two) where you intend to go.
Step 6: Specify the Reason for Your Pass
- Enter the purpose of your pass, such as taking a test.
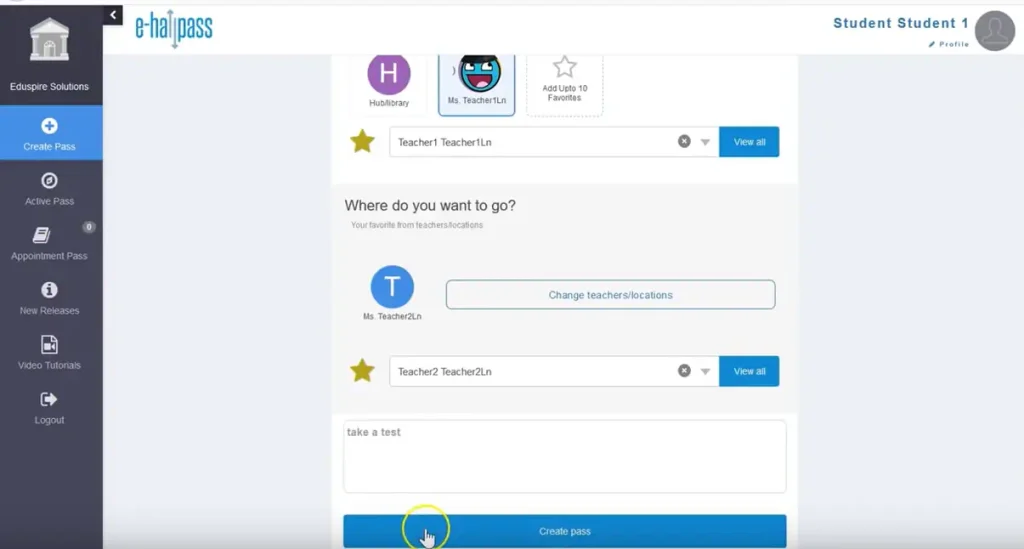
Step 7: Submit the Pass for Approval
- Click ‘Create Pass’ to submit your request.
- The pass will initially appear in red, indicating it is pending approval.
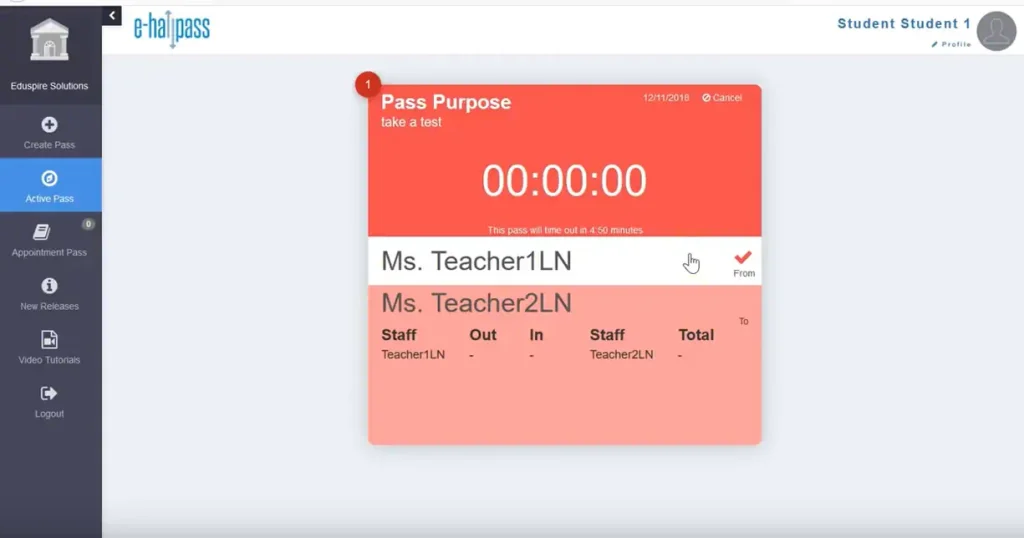
Step 8: Approval Process
- Your teacher can approve the pass either from your device or their dashboard.
- The teacher will click the check mark, enter their PIN, and optionally add a note before approving the pass.
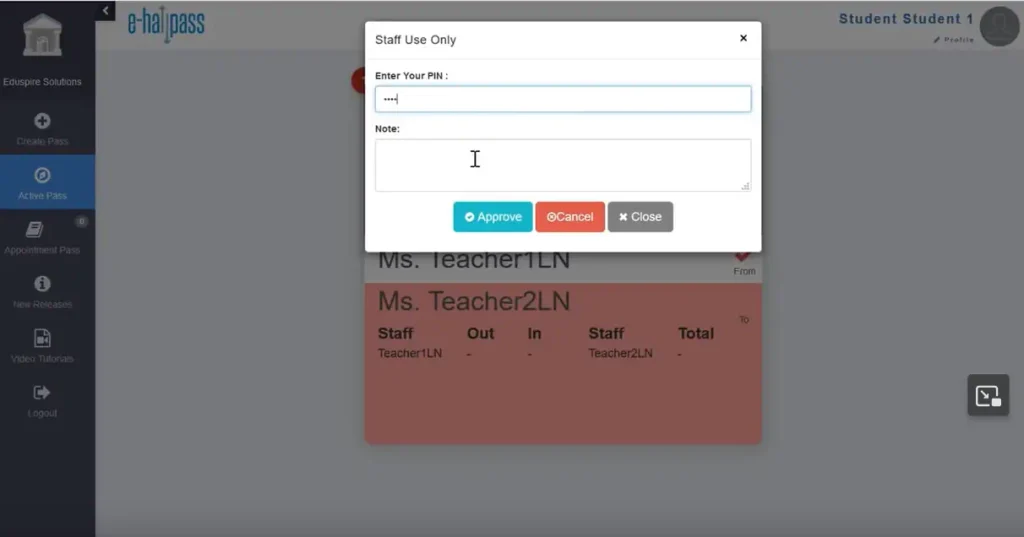
- Once approved, the pass turns green, signaling activation.
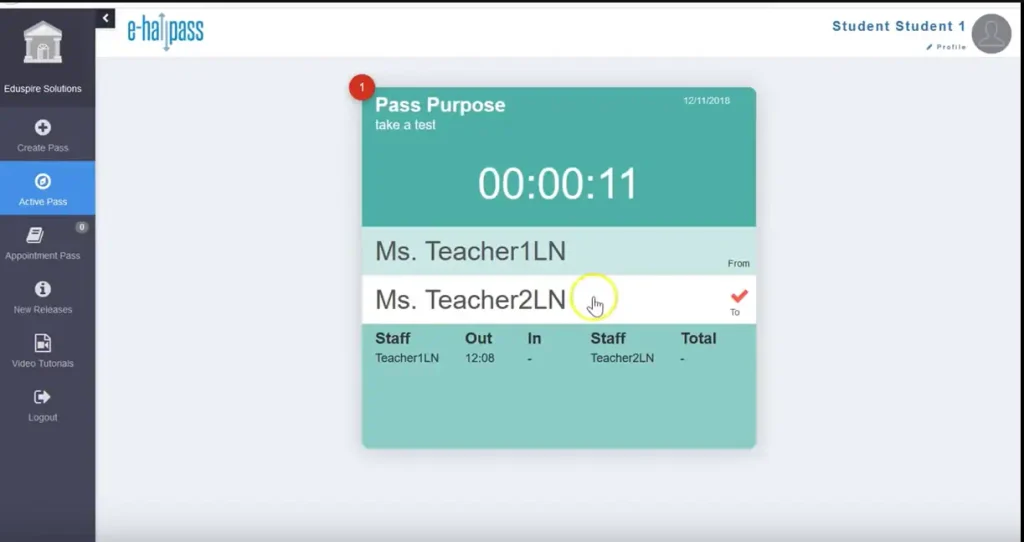
Step 9: During the Pass
- Leave your classroom and proceed to the destination (e.g. Teacher Two’s classroom).
- Upon arrival, Teacher Two will pin you in, which may also involve entering a PIN on your or their device.
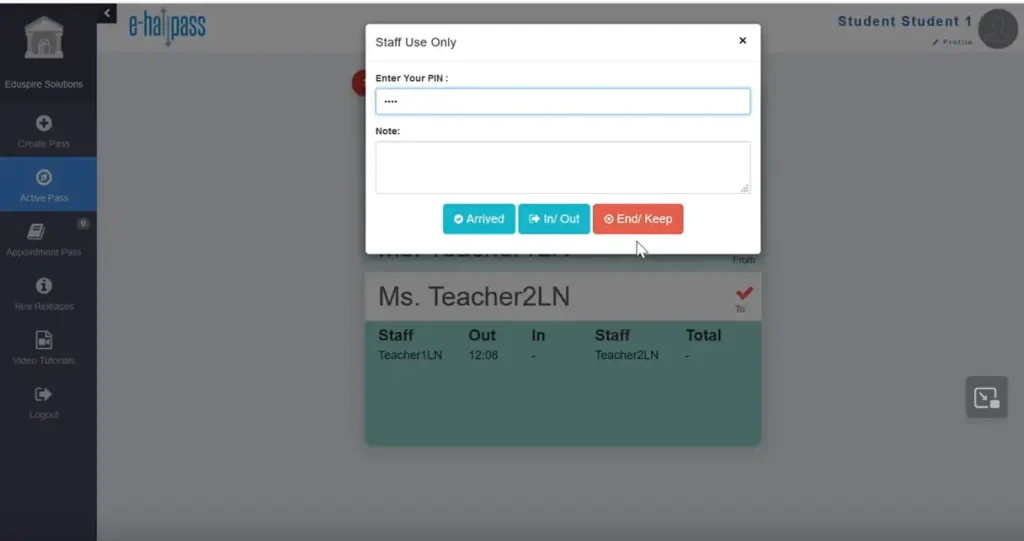
Step 10: Conclude the Pass
- Depending on the situation, Teacher Two can choose to end the pass at the end of the period with the option to ‘end and keep‘.
- This action concludes the pass and documents it on both teachers’ dashboards.
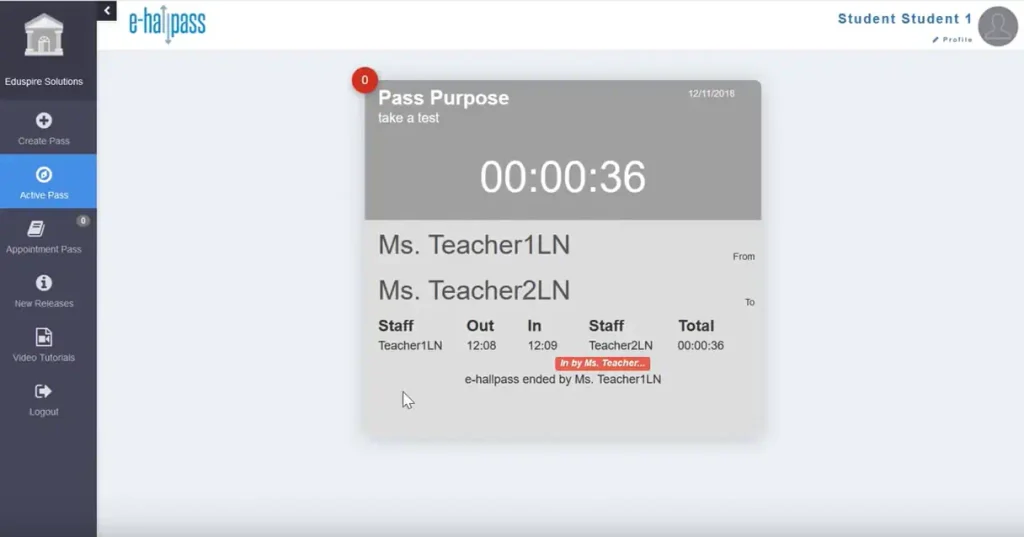
EHallPass: Teacher Dashboard
Teachers can navigate and utilize the EHallPass dashboard effectively to manage and oversee student passes within the school.
Accessing the Teacher Dashboard
- Select the ‘Dashboard’ option from the main menu on the left side of the screen. This is your primary tool for monitoring and managing passes.
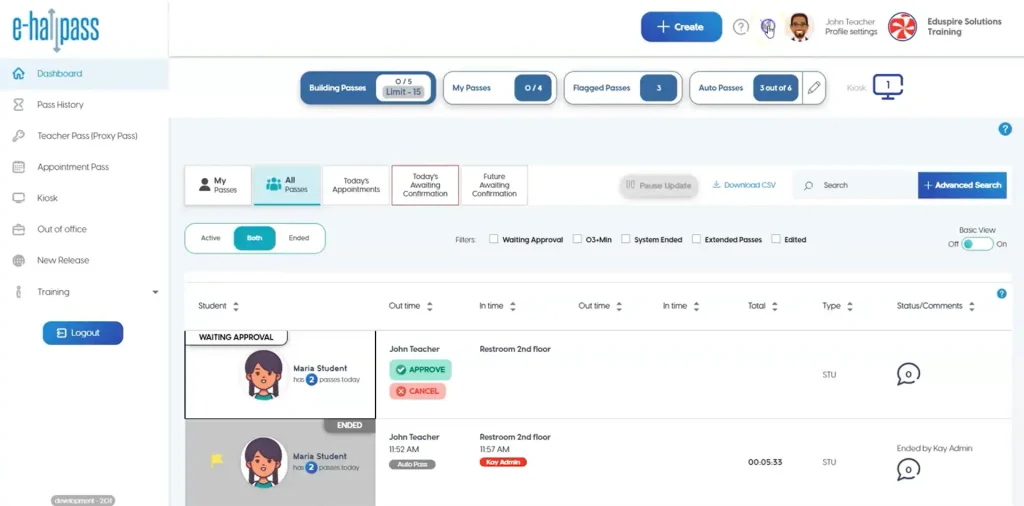
Understanding Dashboard Components
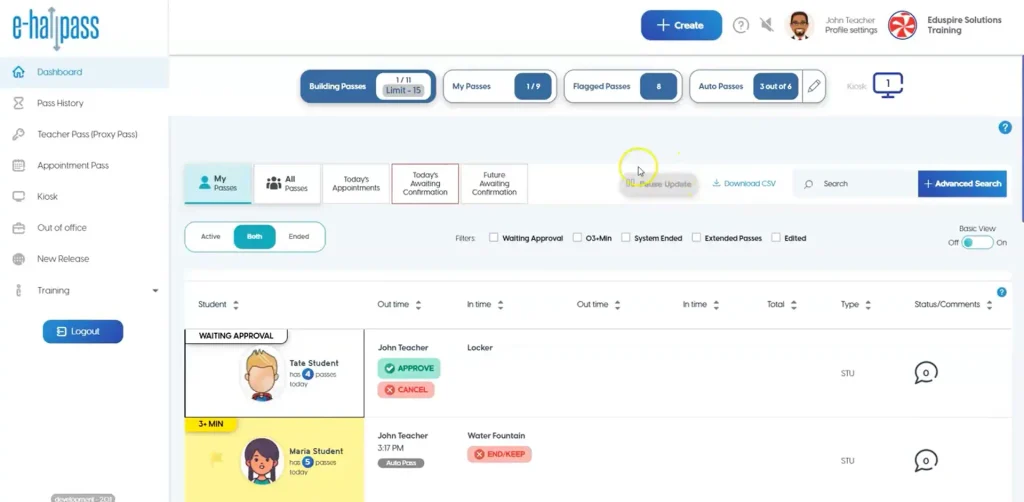
- Statistical Boxes: At the top, view statistics such as the number of active passes, both yours and those across the building.
- Building Passes: Displays active versus total passes issued today.
- My Passes: Shows your current active passes against the total for the day.
- Flagged Passes: Indicates passes that have exceeded set thresholds.
- Auto Passes: Available if enabled by your school, allowing setup of automatic pass approvals.
- Kiosk Mode: Shows the number of active kiosks, if this feature is enabled.
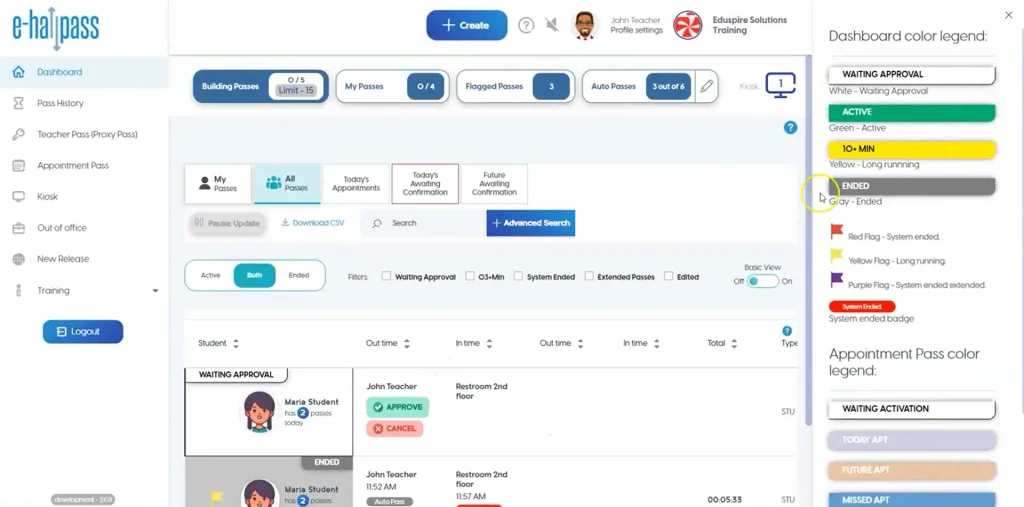
Navigating Passes
- Toggle between ‘My Passes‘ and ‘All Passes‘ to filter the display according to passes you are directly involved with or all passes in the building.
- Choose to view active, ended, or both statuses of passes. By default, the full view is displayed, but you can switch to a basic view for a condensed format.
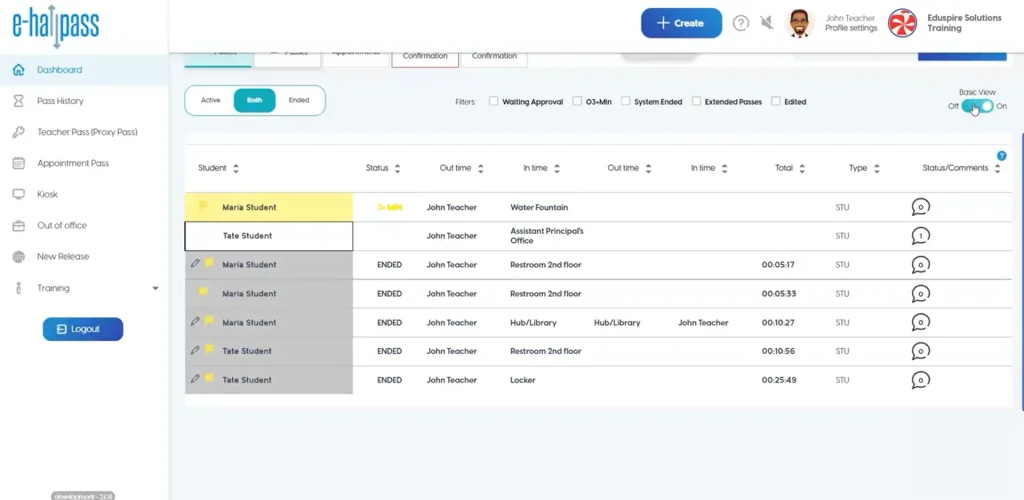
Interacting with Passes
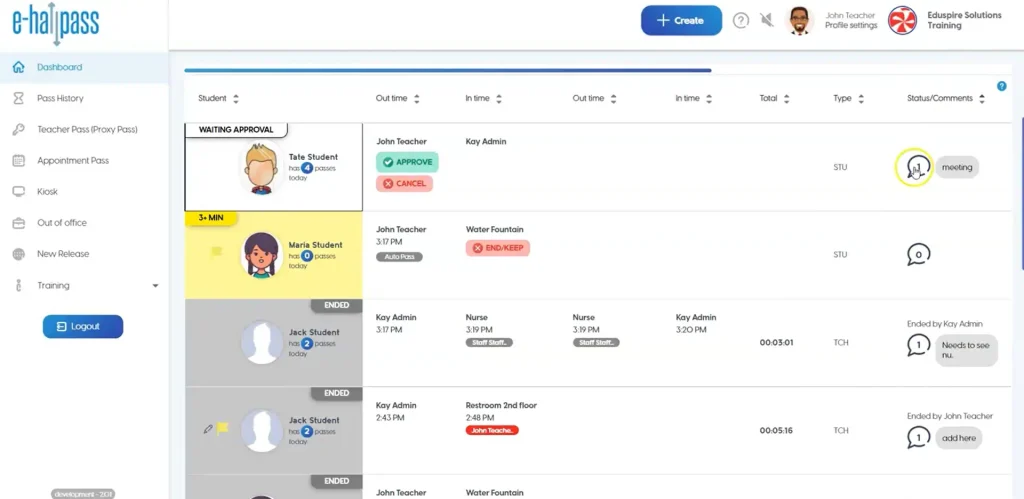
- Click on any pass to see detailed information including the student’s name and photo
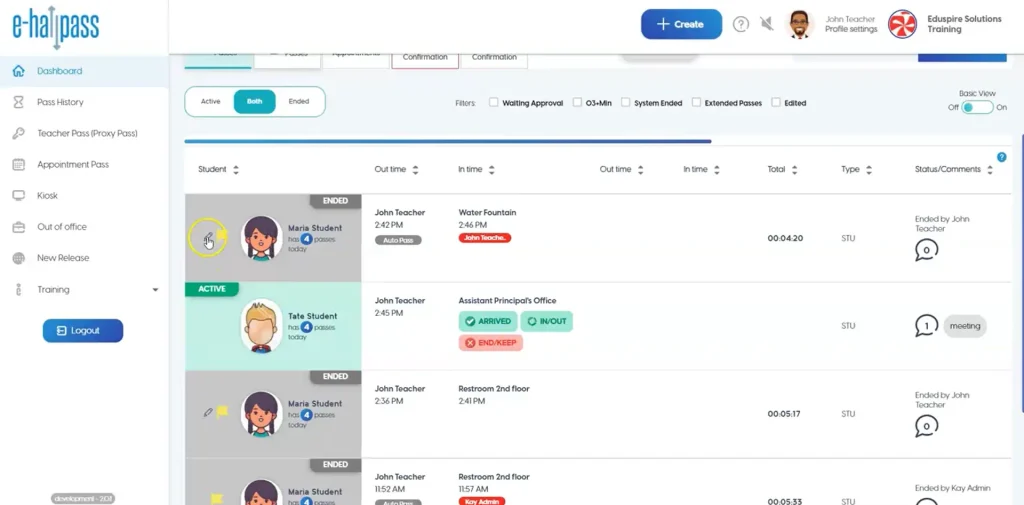
- You can click on a student profile and view the total number of passes they have used today.
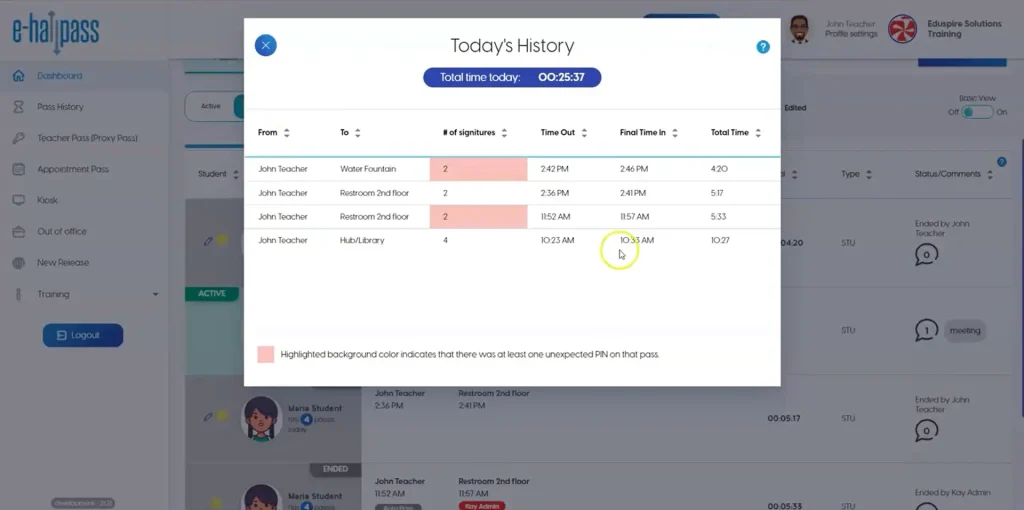
- View and approve passes as needed, with details such as timing, approval information, and whether the pass was automatically approved.
Editing and Commenting on Passes
- Add comments to any pass visible to students while the pass is active.
- Review and edit pass details including the timing and the designated approver, especially if there’s a discrepancy in who approved the pass.
Filtering and Exporting Data
- Use the filtering options to narrow down the pass list based on various criteria. You can also pause real-time updates to manage data more effectively.
- Export pass data to a CSV file for record-keeping or further analysis.
Managing Appointment Passes
- Access tabs for today’s appointment pass to manage and review any appointments you are involved in for the day.
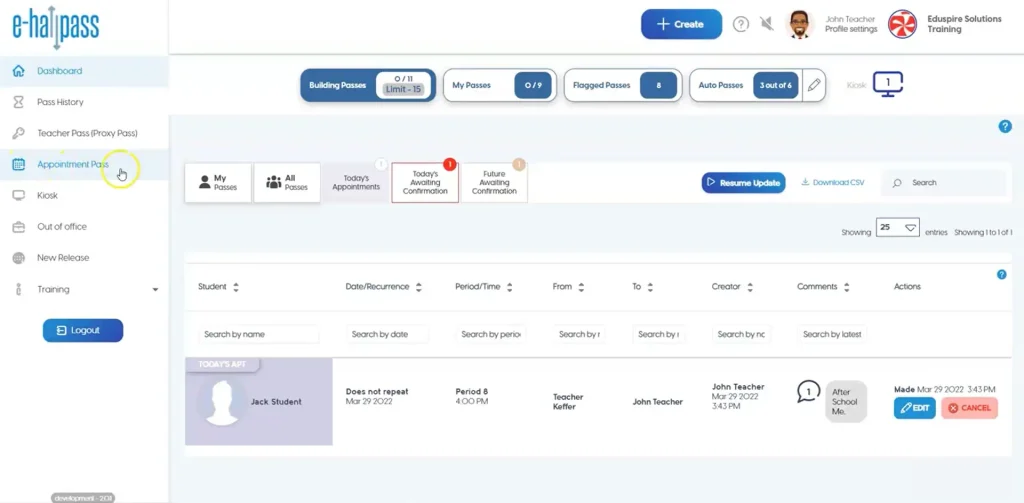
- Utilize the confirmation tabs to handle requests for current and future appointments if your school allows students to request appointment passes.
How can Students Use an EHallPass Effectively?
When using an EHallPass, it is best to operate it within the guidelines responsibly. Students should adhere to school protocols for movement. Here’s how students can effectively use an EHallPass:
- Log In: Use your school credentials to access the system.
- Explore Dashboard: Get familiar with the layout to better understand the tool.
- Create a Pass: Click on ‘Create Pass,’ fill in your destination and reason, then submit and wait for teacher approval, following school rules.
- During the Pass: Maintain accountability by tracking your time outside.
- Complete Your Pass: ‘Close out’ in the system upon returning.
- Review History: Access records for review or administrative needs.
How Teachers can Use an EHallPass effectively?
Teachers should encourage students to use an EHallPass responsibly. They should explain the importance of honesty and accountability while setting clear expectations. As a teacher, using an EhallPass effectively involves simple steps.
- Login and Dashboard Overview: Use your school credentials to Login and explore the dashboard features like pass monitoring, history, and student tracking.
- Reviewing Pass Requests: Evaluate and respond to student pass requests in real time, based on classroom dynamics and school policies.
- Monitoring Pass Usage: Track active passes to ensure students use their passes responsibly and return on time.
- Managing Classroom Flow: Use the portal to control the number of students out of the classroom, maintaining order and focus.
- Analyzing Pass Data: Analyze pass usage data to identify trends and manage frequent requests or high traffic times.
- Communication and Collaboration: Use the platform to communicate with staff regarding student behaviors or past concerns.
Successfully Implement an EHallPass
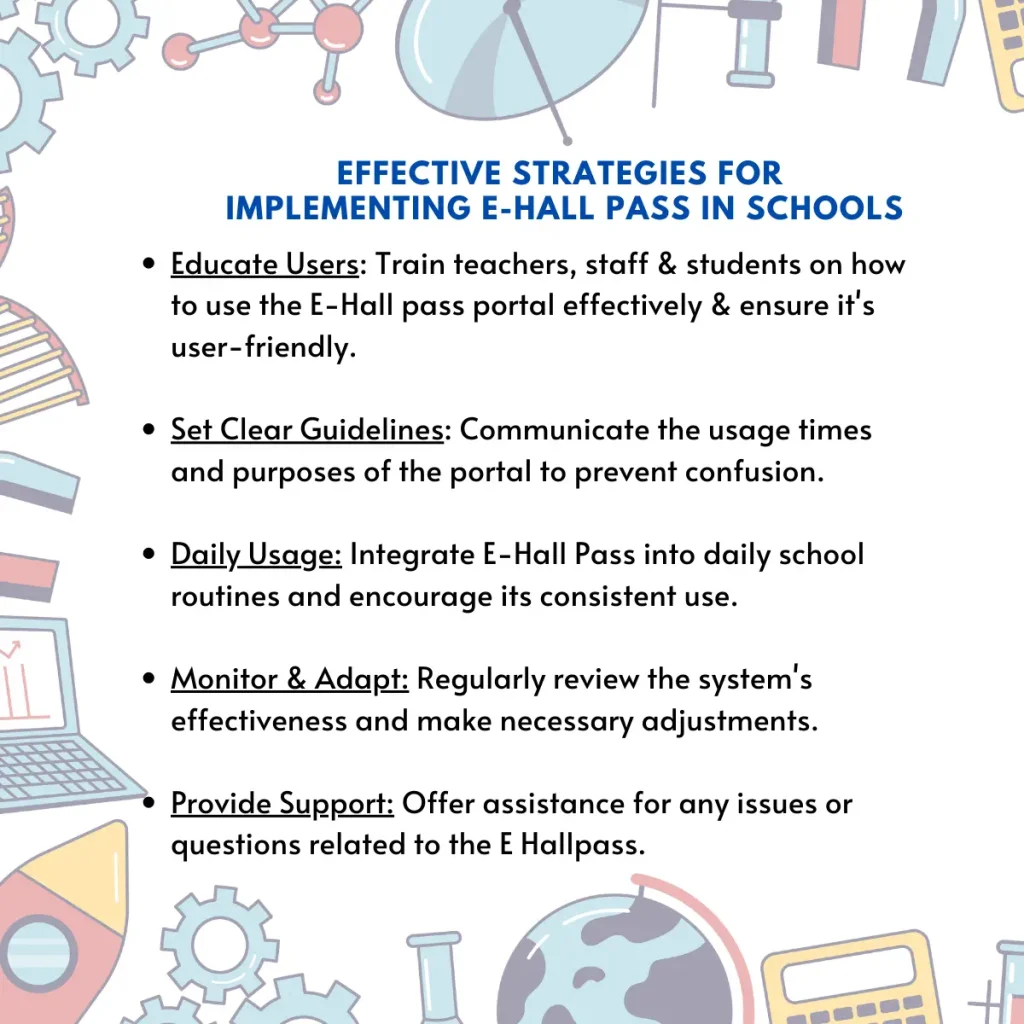
Technology should be learned by everyone. If a school is opting for an EHallPass system, everyone must be well aware of it:
- If you are a student, teacher, or staff member, teach each other. Make it easy to understand how to use the portal effectively.
- Set clear rules and tell us when and why an EHallPass is being used. This helps avoid confusion.
- Make it a routine to use the EHallPass. Teachers should encourage students to use E-hallPass every time they go in the hallway or elsewhere in school.
- Teachers can conduct a workshop or a fun activity for students involving them in learning using the EHallPass.
- Teachers can also address the issues and problems of the students or staff with the usage of EhallPass in the morning assembly.
Access E-HallPass using Third-Party Apps
Accessing E-HallPass through third-party applications can significantly streamline the process for users. Many schools integrate E Hall Pass with Single Sign On (SSO) systems such as Google, Clever, or Canvas, allowing students and faculty to log in using their existing school credentials. This integration not only simplifies the login process but also enhances security by minimizing the need for multiple usernames and passwords. Once logged in via a third-party app, users can seamlessly manage and monitor hall passes directly from their connected accounts.
Accessing E Hall Pass using Clever
Clever is an educational technology platform that provides a single sign-on service for students, teachers, and staff to access a variety of learning applications with one login. This simplifies the process of accessing multiple educational tools and resources. To use E Hall Pass through Clever, simply log into your school or district’s Clever portal with your credentials. Once logged in, navigate to the applications section, find the E Hall Pass app icon, and click on it. This action automatically logs you into your E Hall Pass account, ensuring secure and streamlined access to manage your hall pass needs without additional login steps.
Accessing EHallPass using Office 365
Integrating Microsoft 365 with EHallPass simplifies the login process for users. To access your account, navigate to https://pass.securly.com/ and locate the username and password fields. For a streamlined experience, you can use the “Sign in with Office 365” button. Simply enter your Microsoft 365 login credentials, and once you’re logged in, you’ll have full access to manage and utilize the E-Hall Pass features effectively. This integration ensures a secure and convenient way to handle hall pass management directly through your Microsoft account.
Accessing E-HallPass using ClassLink
ClassLink is a powerful tool that streamlines access to various educational applications by using a single sign-on system provided by your school or district. To log into E-HallPass using ClassLink, start by navigating to your ClassLink dashboard. From there, locate and click on the E-HallPass app icon. This action will redirect you to the E-HallPass login page. Here, you’ll need to enter your username and password and then click the “Login” button to gain access to the E-HallPass system, allowing you to manage your hall pass needs efficiently.
Accessing EHallPass using GG4L
Using GG4L to access EHallPass simplifies the process for schools, offering a secure and streamlined way to handle hall pass management. GG4L, or Global Grid for Learning, provides a consolidated platform where educational apps like EHallPass can be easily accessed through a single sign-on feature. This integration allows students and faculty to log in to EHallPass directly through their GG4L dashboard, enhancing user experience by reducing the steps needed to manage and use hall passes effectively.
Frequently Asked Questions (FAQs)
How do I approve my EHallPass?
Teachers can approve passes directly from their EHallPass dashboard or the student’s device by selecting the teacher’s name or the red checkmark and entering their PIN. Once approved, the pass will display as green.
What if I need to change my destination?
If you need to change your destination, cancel your existing pass and create a new one with the updated location before leaving your classroom.
Can I use E-HallPass during class time?
Yes, E-HallPass can be used during class, but it is subject to your teacher’s approval. Be sure to adhere to any specific guidelines or designated times set by your teacher for requesting passes.
Does a student need to use their personal cell phone or personal device to obtain a pass out of class?
Students can use any web-connected device, like a Chromebook, desktop computer, or tablet, to request a pass from a teacher.
What if my teacher doesn’t approve my pass?
If your pass is not approved, remain in the classroom. Discuss with your teacher to understand the reason for denial or consider reapplying later if necessary.
Can a teacher still create a pass for a student if a student does not have a web-connected device available?
Teachers can quickly create Proxy passes for students using the e-hall pass teacher dashboard.
